lunedì 3 agosto 2015

Primo abbozzo del domotic center con Arduino

Oggi presento il primo abbozzo del mio Domotic Center con Arduino...
Ovvero, Arduino collegato ad Internet tramite Ethernet Shield, dotato di pagina web propria all'indirizzo 192.168.1.105, dove visualizzerà la temperatura e l'umidità di casa ed un tasto con il quale farà partire, tramite infrarosso, il robot aspirapolvere Samsung Navibot.


Prima di tutto bisogna scaricare la libreria per l'infrarosso di Shirriff:
http://www.righto.com/2009/08/multi-protocol-infrared-remote-library.html

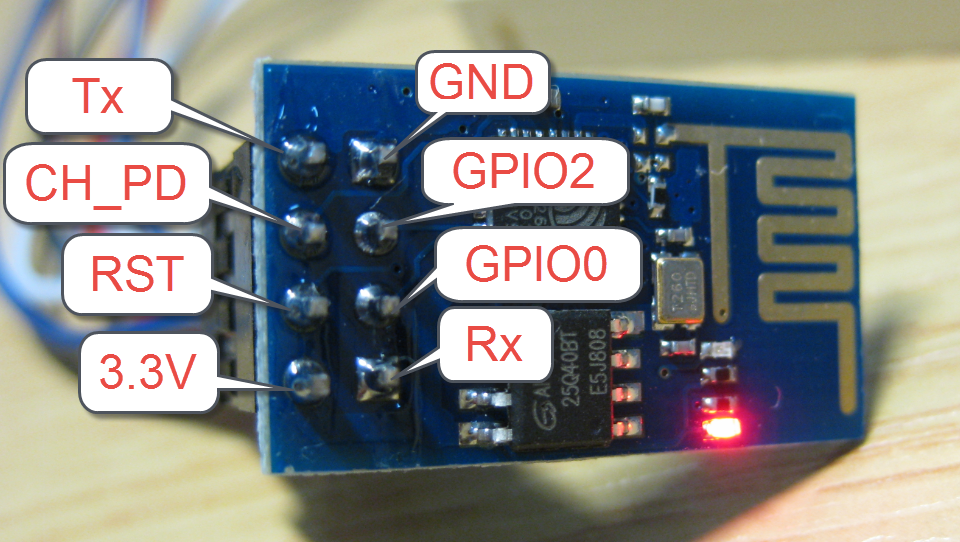
Per quanto riguarda la parte hardware, bisogna collegare un led emettitore IR sul pin3, in questo sketch recupererò anche la temperatura ambientale e l'umidità tramite il sensore DHT (http://playground.arduino.cc/Main/DHTLib) per uso futuro (prima o poi collegherò Arduino alla caldaia, per poter accendere/spegnere il riscaldamento da remoto)...

Questo lo sketch:

#include <SPI.h>
#include <Ethernet.h>
#include <IRremote.h>
#include <dht.h>
#define dht_dpin A0
dht DHT;

int valori[5]; //Array in cui ci salvi i valori letti
int T_campionamento;
int somma;
float temperaturamedia;
float umido;

IRsend irsend;
int pos = 0; 
byte mac[] = { 0xDE, 0xAD, 0xBE, 0xEF, 0xFE, 0xED }; 
IPAddress ip(192, 168, 1, 105);
IPAddress gateway(192, 168, 1, 1);
IPAddress subnet(255, 255, 255, 0);
EthernetServer server(80);     
String readString;

void setup() {
  delay(500);
  Serial.begin(9600);
  Ethernet.begin(mac, ip, gateway, subnet);
  server.begin();
  Serial.print("Il WebServer è all'indirizzo ");
  Serial.println(Ethernet.localIP());
  lettura();
}

void loop() {
  EthernetClient client = server.available();
  if (client) {
    while (client.connected()) {   
      if (client.available()) {
        char c = client.read();
     
        //read char by char HTTP request
        if (readString.length() < 100) {
          //store characters to string
          readString += c;
         }

         //if HTTP request has ended
         if (c == '\n') {          
           Serial.println(readString); //print to serial monitor for debuging
     
           client.println("HTTP/1.1 200 OK"); //send new page
           client.println("Content-Type: text/html");
           client.println();     
           client.println("<HTML>");
           client.println("<HEAD>");
           client.println("<meta name='apple-mobile-web-app-capable' content='yes' />");
           client.println("<meta name='apple-mobile-web-app-status-bar-style' content='black-translucent' />");
           client.println("<link rel='stylesheet' type='text/css' href='http://randomnerdtutorials.com/ethernetcss.css' />");
           client.println("<TITLE>Smartgatto domotic house</TITLE>");
           client.println("</HEAD>");
           client.println("<BODY>");
           client.println("<H1>Smartgatto domotic house</H1>");
           client.println("<hr />");
           client.println("<br />");  
           client.println("<H2>Avvia ciclo di pulizia con Navibot</H2>");
           client.println("<br />");  
           client.println("<a href=\"/?button1on\"\">Avvia pulizia casa</a>");
           client.println("<br />");     
           client.println("<br />"); 
           client.println("<br />");client.println("<H3>Home temperature is: ");
           client.println(temperaturamedia);
           client.println("C");
           client.println("<br />"); 
           
           client.println("Humidity is: ");
           client.println(umido);
           client.println("%");
           client.println("<br /></H3>");
           client.println("<br />"); 
           client.println("<br />"); 
                      
           client.println("<p>Creato da Smartgatto 2015</p>");  
           client.println("<br />"); 
           client.println("</BODY>");
           client.println("</HTML>");
     
           client.stop();
           //controls the Arduino if you press the buttons
           if (readString.indexOf("?button1on") >0){
               inviair();
           }
        
            //clearing string for next read
            readString="";  
           
         }
       }
    }
}
}

void inviair() {
    unsigned int Auto[68] = {4590, 4590, 590, 1690, 590, 590, 590, 590, 590, 590, 590, 590, 590, 590, 590,590, 590, 1690, 590, 1690, 590, 590, 590, 590, 590, 590, 590, 590, 590, 590, 590, 590, 590, 1690, 590, 590, 590, 1690, 590, 590, 590, 590, 590, 590, 590, 590, 590, 590, 590, 590, 590, 1690, 590, 590, 590, 1690, 590, 1690, 590, 1690, 590, 1690, 590, 1690, 590, 1690, 590, 65750};
    irsend.sendRaw(Auto, 68, 38);
    Serial.print("Codice infrarosso inviato");
 }


void lettura() {
    for(int i=0; i<5; i++){
    DHT.read11(dht_dpin);  
    umido = DHT.humidity;
    valori[i] = DHT.temperature;
    delay(500); //se vuoi fare una lettura ogni tot millisecondi
                            //non è necessario
  } 
    somma = 0; // devi essere sicuro che il primo valore sia zero, altrimenti poi sballa tutto
    for(int i=0; i<5; i++)
    somma = somma + valori[i];
    temperaturamedia = somma / 5;
  
}

lunedì 6 luglio 2015

Arduino accende il Samsung Navibot

Ciao a tutti,
con questo post vorrei spiegare come ho creato questo piccolo sketch per Arduino per accendere il Samsung Navibot tramite infrarossi.
Un led emettitore infrarosso va collegato alla porta PWM n.3 di Arduino.
Un segnale che corrisponde al tasto PLAY del telecomando del Navibot viene inviato ogni 5 secondi, in contemporanea il led on board di Arduino si illumina per avvisare quando viene emesso il segnale.

/*
 * Questa demo serve per avviare il robot Navibot tramite infrarossi
 * Un led infrarosso deve essere collegato ad Arduino PWM al pin 3.
 */

#include <IRremote.h>

IRsend irsend;

void setup()
{
  pinMode(13, OUTPUT);
  Serial.begin(9600);
}


void loop() {
  delay(4500);
  digitalWrite(13, HIGH);   // turn the LED on (HIGH is the voltage level)
  delay(500);
  digitalWrite(13, LOW);    // turn the LED off by making the voltage LOW
  unsigned int Auto[68] = {4590, 4590, 590, 1690, 590, 590, 590, 590, 590, 590, 590, 590, 590, 590, 590,590, 590, 1690, 590, 1690, 590, 590, 590, 590, 590, 590, 590, 590, 590, 590, 590, 590, 590, 1690, 590, 590, 590, 1690, 590, 590, 590, 590, 590, 590, 590, 590, 590, 590, 590, 590, 590, 1690, 590, 590, 590, 1690, 590, 1690, 590, 1690, 590, 1690, 590, 1690, 590, 1690, 590, 65750};
      irsend.sendRaw(Auto, 68, 38);
}

giovedì 2 luglio 2015

Arduino su internet! Parte 2


Con il seguente codice posso collegare in automatico Arduino (opportunamente collegato al modulo ESP8266

come visto in precedenza) alla mia rete wifi di casa (da cambiare il SSID e la password):

#include <SoftwareSerial.h>
SoftwareSerial softSerial(2, 3); // RX, TX
String WSSID = "xxxxxxxxxxxxxxxxx";
String WPASS = "yyyyyyyyyyyyyyyyy";
void setup() {
connetti();
}


void loop(){
}

void connetti() {

softSerial.begin(9600);
Serial.begin(9600);
softSerial.println("AT");
delay(500);
softSerial.println("AT+RST");
delay(500);

softSerial.println( "AT+CWJAP=\""+WSSID+"\",\""+WPASS+"\"");
delay(1000);

}

Con questo listato si connette automaticamente ad internet grazie alla funzione DHCP del router, quindi l'indirizzo IP lo dirà il router.

Poichè al momento non ho trovato come fare per inviare via seriale l'indirizzo IP, ho impostato il mio router che dia un indirizzo statico ad arduino...


In questo modo si può pingare l'indirizzo di arduino, ma se sul browser si digita l'indirizzo di arduino al momento non si ottengono risposte...a questo miro nella prossima puntata!


PS: nel caso si volesse specificare per qualche motivo l'indirizzo ip, bisogna dare il seguente comando:AT+CIPSTA="192.168.92.82","192.168.92.254","255.255.255.0"prima di AT+CWJAP...

Arduino su internet! Parte 1

Ciao a tutti, in questo post illustrerò i miei primi passi per poter connettere Arduino a internet utilizzando il modulo ESP8266, dal costo esiguo di 5 euro...
Il modulo attualmente in mio possesso è questo ed è la versione 01, sono in attesa del modello 12:

La sua piedinatura è questa:


Dunque...se vogliamo collegarlo a Arduino ricordiamoci SEMPRE che Arduino lavora a 5v mentre il modulo purtroppo lavora a 3.3v, per cui non si può collegare direttamente Arduino all'ESP, pena, a lungo andare, la bruciatura del modulo stesso.
Per cui, per collegare Arduino al modulo ESP occorre utilizzare una conversione dei segnali da 5v a 3.3v, il metodo che ho utilizzato è quello dei DIODI 1N4148:


Bene, una volta effettuati gli opportuni collegamenti (la resistenza da 10k per me era obbligatoria), vado a caricare il seguente sketch, tramite l'interfaccia di Arduino:


#include <SoftwareSerial.h>
SoftwareSerial ESPserial(10, 11); // RX | TX
void setup() 
{
    Serial.begin(9600);     // communication with the host computer
    //while (!Serial)   { ; }
    // Start the software serial for communication with the ESP8266
    ESPserial.begin(9600);  
    Serial.println("");
    Serial.println("Remember to to set Both NL & CR in the serial monitor.");
    Serial.println("Ready");
    Serial.println("");    
}
void loop() 
{
    // listen for communication from the ESP8266 and then write it to the serial monitor
    if ( ESPserial.available() )   {  Serial.write( ESPserial.read() );  }
    // listen for user input and send it to the ESP8266
    if ( Serial.available() )       {  ESPserial.write( Serial.read() );  }
}


Una volta caricato su Arduino facciamo un reset di sicurezza e facciamo partire tutto.
Apriamo il monitor seriale e da li inviamo i comandi AT che vogliamo...
I comandi di prova che ho inviato sono:
AT (con risposta OK)
AT+RST(con risposta OK, più una stringa di caratteri "casuali")
AT+GMR(per sapere il numero di firmware, risposta 00200.9.4)

e ora...per quello che è stato costruito!
AT+CWLAP(restituisce l'elenco delle reti percepite)
AT+CWJAP="SSID","PASSWORD"(sostituendo SSID e PASSWORD con le proprie si connette alla rete)
AT+CIFSR(restituisce indirizzo IP e MAC address)

Una parte dei comandi è qui:
ESP8266ATCommandsSet

Il mio prossimo passo sarà far collegare Arduino alla rete restituendo una pagina HTML!
A presto, spero!

venerdì 22 maggio 2015

Creare un server PHP con Apache2 su Ubuntu 14.04 per inviare notifiche push tramite GCM ad un terminale android

Creiamo un server PHP con Apache2 su una macchina Ubuntu...


innanzitutto installare Apache2, seguendo le istruzioni di questo sito:


ricordiamoci che per il nostro esempio bisogna anche installare Curl, con il seguente comando sempre via terminale:

sudo apt-get install php5-curl


Quindi creiamo un file PHP nella nostra cartella (quella di base dovrebbe essere /var/www/ ) e lo nominiamo gcm.php

<?php
//Generic php function to send GCM push notification
   function sendMessageThroughGCM($registatoin_ids, $message) {
//Google cloud messaging GCM-API url
        $url = 'https://android.googleapis.com/gcm/send';
        $fields = array(
            'registration_ids' => $registatoin_ids,
            'data' => $message,
        );
// Update your Google Cloud Messaging API Key
define("GOOGLE_API_KEY", "InserisciQuiLaTuaServerKey");
        $headers = array(
            'Authorization: key=' . GOOGLE_API_KEY,
            'Content-Type: application/json'
        );
        $ch = curl_init();
        curl_setopt($ch, CURLOPT_URL, $url);
        curl_setopt($ch, CURLOPT_POST, true);
        curl_setopt($ch, CURLOPT_HTTPHEADER, $headers);
        curl_setopt($ch, CURLOPT_RETURNTRANSFER, true);
curl_setopt ($ch, CURLOPT_SSL_VERIFYHOST, 0);
        curl_setopt($ch, CURLOPT_SSL_VERIFYPEER, false);
        curl_setopt($ch, CURLOPT_POSTFIELDS, json_encode($fields));
        $result = curl_exec($ch);
        if ($result === FALSE) {
            die('Curl failed: ' . curl_error($ch));
        }
        curl_close($ch);
        return $result;
    }
?>
<?php

//Post message to GCM when submitted
$pushStatus = "GCM Status Message will appear here";
if(!empty($_GET["push"])) {
$gcmRegID  = file_get_contents("Id.txt");
$pushMessage = $_POST["message"];
if (isset($gcmRegID) && isset($pushMessage)) {
$gcmRegIds = array($gcmRegID);
$message = array("m" => $pushMessage);
$pushStatus = sendMessageThroughGCM($gcmRegIds, $message);
}
}

//Get Reg ID sent from Android App and store it in text file
if(!empty($_GET["shareRegId"])) {
$gcmRegID  = $_POST["regId"]; 
file_put_contents("Id.txt",$gcmRegID);
echo "Done!";
exit;
}
?>
<html>
    <head>
        <title>Google Cloud Messaging (GCM) in PHP</title>
<style>
div#formdiv, p#status{
text-align: center;
background-color: #FFFFCC;
border: 2px solid #FFCC00;
padding: 10px;
}
textarea{
border: 2px solid #FFCC00;
margin-bottom: 10px;
text-align: center;
padding: 10px;
font-size: 25px;
font-weight: bold;
}
input{
background-color: #FFCC00;
border: 5px solid #fff;
padding: 10px;
cursor: pointer;
color: #fff;
font-weight: bold;
}
 
</style>
<script src="http://ajax.googleapis.com/ajax/libs/jquery/1.11.1/jquery.min.js"></script>
<script>
$(function(){
$("textarea").val("");
});
function checkTextAreaLen(){
var msgLength = $.trim($("textarea").val()).length;
if(msgLength == 0){
alert("Please enter message before hitting submit button");
return false;
}else{
return true;
}
}
</script>
    </head>
<body>
<div id="formdiv">
<h1>Google Cloud Messaging (GCM) in PHP</h1>
<form method="post" action="/gcm/gcm.php/?push=true" onsubmit="return checkTextAreaLen()">                                                      
<textarea rows="5" name="message" cols="45" placeholder="Message to send via GCM"></textarea> <br/>
<input type="submit"  value="Invia le notifiche tramite GCM" />
</form>
</div>
<p id="status">
<?php echo $pushStatus; ?>
</p>        
    </body>

</html>

Nella stessa cartella dovrà esservi un file Id.txt dove dentro vi sarà scritto la key del device autorizzato...

venerdì 3 aprile 2015

CE Fake Reveal: sovrapporre un'immagine CE scalabile sullo sfondo della fotocamera.

All'avvio dell'applicazione si aprirà uno sfondo live della fotocamera e verrà sovrapposta una scritta CE con le misure conforme al marchio CE. Questa immagine è scalabile e con un minimo di alpha, mantenendo le proporzioni, in modo da confrontarla con l'immagine CE sull'oggetto da verificare.
Ricordarsi di aggiungere su manifest le seguenti righe per abilitare l'uso della fotocamera:

 <uses-permission android:name="android.permission.CAMERA" />
 <uses-feature android:name="android.hardware.camera" />
 <uses-feature android:name="android.hardware.camera.autofocus" />


CE_Fake_Reveal.java :

package com.example.marco.cefakereveal;


import java.io.IOException;

import android.app.Activity;
import android.content.pm.ActivityInfo;
import android.graphics.PixelFormat;
import android.hardware.Camera;
import android.os.Bundle;
import android.view.SurfaceHolder;
import android.view.SurfaceView;
import android.view.View;
import android.view.Window;
import android.view.WindowManager;
import android.graphics.Matrix;
import android.view.MotionEvent;
import android.view.ScaleGestureDetector;
import android.widget.ImageView;
import android.widget.TextView;


public class CE_Fake_Reveal extends Activity implements SurfaceHolder.Callback{

    ImageView img;
    private Matrix matrix = new Matrix();
    private float scale = 0.2f;
    private ScaleGestureDetector SGD;
    Camera camera;
    SurfaceView surfaceView;
    SurfaceHolder surfaceHolder;
    boolean previewing = false;


    @Override
    public void onCreate(Bundle savedInstanceState) {
        super.onCreate(savedInstanceState);
        requestWindowFeature(Window.FEATURE_NO_TITLE);
        getWindow().setFlags(WindowManager.LayoutParams.FLAG_FULLSCREEN, WindowManager.LayoutParams.FLAG_FULLSCREEN);
        setContentView(R.layout.activity_ce__fake__reveal);
        setRequestedOrientation(ActivityInfo.SCREEN_ORIENTATION_LANDSCAPE);
        img = (ImageView)findViewById(R.id.imageView1);
        getWindow().setFormat(PixelFormat.UNKNOWN);
        surfaceView = (SurfaceView)findViewById(R.id.camerapreview);
        surfaceHolder = surfaceView.getHolder();
        surfaceHolder.addCallback(this);
        SGD = new ScaleGestureDetector(this,new ScaleListener());

        scale = 1.0f;

        img.addOnLayoutChangeListener(new View.OnLayoutChangeListener() {
        @Override
        public void onLayoutChange(View v, int left, int top, int right, int bottom, int oldLeft, int oldTop, int oldRight, int oldBottom)
        {
        updateScale();

        }
        });


     }


    @Override
    public boolean onTouchEvent(MotionEvent ev) {
        SGD.onTouchEvent(ev);
        return true;
    }

    void updateScale()
    {
        final float imageWidth = (float)img.getDrawable().getIntrinsicWidth();
        final float imageHeight = (float)img.getDrawable().getIntrinsicHeight();
        float frameHeight = img.getHeight();
        float frameWidth = img.getWidth();

        matrix.reset();
        matrix.postTranslate(-imageWidth / 2.0f, -imageHeight / 2.0f);
        matrix.postScale(scale, scale);
        matrix.postTranslate(frameWidth / 2.0f, frameHeight / 2.0f );
        img.setImageMatrix(matrix);

    }


    private class ScaleListener extends ScaleGestureDetector.
            SimpleOnScaleGestureListener {

        @Override
        public boolean onScale(ScaleGestureDetector detector) {
            scale *= detector.getScaleFactor();
            scale = Math.max(0.03f, Math.min(scale, 0.5f));
            updateScale();
            return true;

        }
    }


/* *************************************************/
/* Ora inizia il codice che riguarda la fotocamera */
/* *************************************************/


    @Override
    public void surfaceChanged(SurfaceHolder holder, int format, int width,
                               int height) {
// TODO Auto-generated method stub
        if(previewing){
            camera.stopPreview();
            previewing = false;
        }

        if (camera != null){
            try {
                camera.setPreviewDisplay(surfaceHolder);
                Camera.Parameters parameters = camera.getParameters();
                parameters.setFocusMode(Camera.Parameters.FOCUS_MODE_CONTINUOUS_PICTURE);
                camera.setParameters(parameters);
                camera.startPreview();
                previewing = true;
            } catch (IOException e) {
                // TODO Auto-generated catch block
                e.printStackTrace();
            }
        }
    }

    @Override
    public void surfaceCreated(SurfaceHolder holder) {
// TODO Auto-generated method stub
        camera = Camera.open();
    }

    @Override
    public void surfaceDestroyed(SurfaceHolder holder) {
// TODO Auto-generated method stub
        camera.stopPreview();
        camera.release();
        camera = null;
        previewing = false;
    }


}

activity_ce_fake_reveal.xml :

<?xml version="1.0" encoding="utf-8"?>
<RelativeLayout xmlns:android="http://schemas.android.com/apk/res/android"
    android:orientation="vertical"
    android:layout_width="fill_parent"
    android:layout_height="fill_parent"
    android:weightSum="1">

    <SurfaceView
        android:id="@+id/camerapreview"
        android:layout_width="fill_parent"
        android:layout_height="fill_parent" />

    <ImageView
        android:id="@+id/imageView1"

        android:scaleType="matrix"
        android:layout_height="fill_parent"
        android:layout_width="fill_parent"
        android:src="@drawable/ce"
        android:layout_centerInParent="true"
        android:alpha="0.4" />

    <TextView
        android:layout_width="wrap_content"
        android:layout_height="wrap_content"
        android:textAppearance="?android:attr/textAppearanceLarge"
        android:text="Confrontare la scritta CE per verificarne la validità"
        android:id="@+id/textView"
        android:textStyle="bold"
        android:textColor="#fffdff12"
        android:layout_alignParentTop="true"
        android:textAlignment="center"
        android:layout_centerHorizontal="true" />


</RelativeLayout>

lunedì 23 marzo 2015

Android Dev: preview camera liscio

activity_ce_fake_reveal.xml:

<?xml version="1.0" encoding="utf-8"?>
<LinearLayout xmlns:android="http://schemas.android.com/apk/res/android"
    android:orientation="vertical"
    android:layout_width="fill_parent"
    android:layout_height="fill_parent"
    android:weightSum="1">

    <SurfaceView
        android:id="@+id/camerapreview"
        android:layout_width="fill_parent"
        android:layout_height="fill_parent" />

</LinearLayout>


Manifest:
<?xml version="1.0" encoding="utf-8"?>
<manifest xmlns:android="http://schemas.android.com/apk/res/android"
    package="com.example.marco.cefakereveal" >

    <application
        android:allowBackup="true"
        android:icon="@mipmap/ic_launcher"
        android:theme="@style/AppTheme" >
        <activity
            android:name=".CE_Fake_Reveal"
           android:label="@string/app_name" >
            <intent-filter>
                <action android:name="android.intent.action.MAIN" />

                <category android:name="android.intent.category.LAUNCHER" />
            </intent-filter>
        </activity>
    </application>
    <uses-permission android:name="android.permission.CAMERA"></uses-permission>

</manifest>

CE_Fake_Reveal.java
package com.example.marco.cefakereveal;

import java.io.IOException;

import android.app.Activity;
import android.content.pm.ActivityInfo;
import android.graphics.PixelFormat;
import android.hardware.Camera;
import android.os.Bundle;
import android.view.SurfaceHolder;
import android.view.SurfaceView;
import android.view.Window;
import android.view.WindowManager;

public class CE_Fake_Reveal extends Activity implements SurfaceHolder.Callback{

    Camera camera;
    SurfaceView surfaceView;
    SurfaceHolder surfaceHolder;
    boolean previewing = false;

    /** Called when the activity is first created. */
    @Override
    public void onCreate(Bundle savedInstanceState) {
        super.onCreate(savedInstanceState);
        requestWindowFeature(Window.FEATURE_NO_TITLE);
        getWindow().setFlags(WindowManager.LayoutParams.FLAG_FULLSCREEN, WindowManager.LayoutParams.FLAG_FULLSCREEN);
        setContentView(R.layout.activity_ce__fake__reveal);
        setRequestedOrientation(ActivityInfo.SCREEN_ORIENTATION_LANDSCAPE);


        getWindow().setFormat(PixelFormat.UNKNOWN);
        surfaceView = (SurfaceView)findViewById(R.id.camerapreview);
        surfaceHolder = surfaceView.getHolder();
        surfaceHolder.addCallback(this);
     //   surfaceHolder.setType(SurfaceHolder.SURFACE_TYPE_PUSH_BUFFERS);
    }


    @Override
    public void surfaceChanged(SurfaceHolder holder, int format, int width,
                               int height) {
// TODO Auto-generated method stub
        if(previewing){
            camera.stopPreview();
            previewing = false;
        }

        if (camera != null){
            try {
                camera.setPreviewDisplay(surfaceHolder);
                Camera.Parameters parameters = camera.getParameters();
                parameters.setFocusMode(Camera.Parameters.FOCUS_MODE_CONTINUOUS_PICTURE);
                camera.setParameters(parameters);
                camera.startPreview();
                previewing = true;
            } catch (IOException e) {
                // TODO Auto-generated catch block
                e.printStackTrace();
            }
        }
    }

    @Override
    public void surfaceCreated(SurfaceHolder holder) {
// TODO Auto-generated method stub
        camera = Camera.open();
    }

    @Override
    public void surfaceDestroyed(SurfaceHolder holder) {
// TODO Auto-generated method stub
        camera.stopPreview();
        camera.release();
        camera = null;
        previewing = false;
    }
}